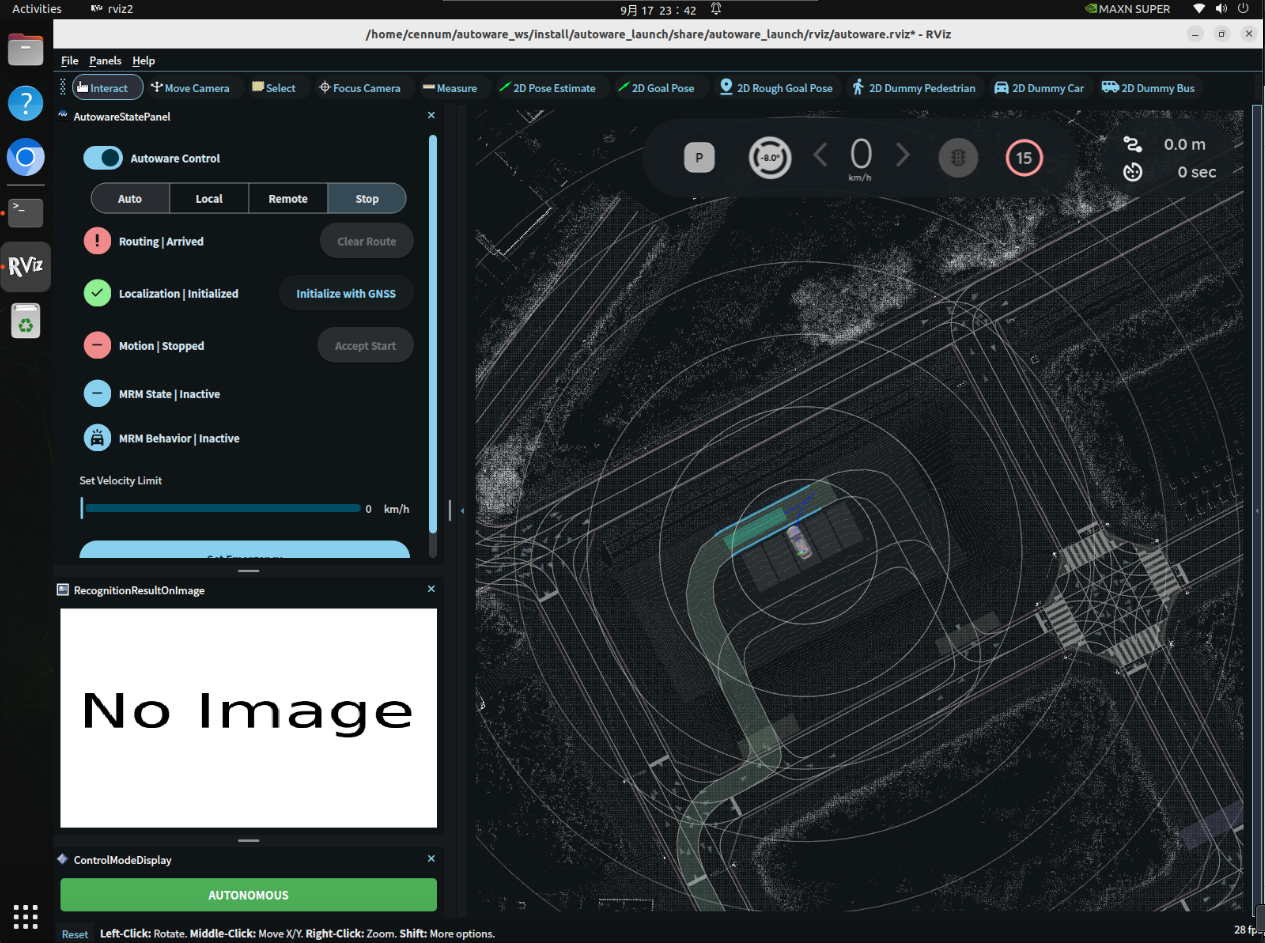

以下是我的jetson orin nano的环境展示

1.拉取源码
在你的ros2工作空间下拉取
git clone https://github.com/autowarefoundation/autoware.git
cd autoware
2.安装环境
使用autoware文件夹内的setup-dev-env.sh自动安装会出现很多问题./setup-dev-env.sh
虽然麻烦,建议一个一个手动安装
参考官方教程
https://autowarefoundation.github.io/autoware-documentation/main/installation/autoware/source-installation/
以下是手动安装教程
2.1 安装 Ansible
自动脚本软件
#Remove apt installed ansible
#卸载通过apt安装的ansible
sudo apt-get purge ansible
#apt安装 pipx
sudo apt-get -y update
sudo apt-get -y install pipx

#添加 pipx 到 系统 PATH
python3 -m pipx ensurepath

#pipx安装 ansible
pipx install --include-deps --force "ansible==6.\*"

安装完成记得生效
source /.bashrc
2.2 安装构建工具
编译缓存工具
sudo apt-get install -y ccache2.3 安装开发工具
# For the environment variables
wget -O /tmp/amd64.env https://raw.githubusercontent.com/autowarefoundation/autoware/main/amd64.env && source /tmp/amd64.env

sudo apt-get update
sudo apt install python3-pip
sudo apt-get install -y golang
sudo apt-get install -y ros-${rosdistro}-plotjuggler-ros
sudo apt-get install -y git-lfs

# Setup Git LFS
git lfs install

pip3 install pre-commit
pip3 install clang-format==${pre_commit_clang_format_version}
2.4安装 gdown
pip3 install gdown
2.5安装 geographiclib
sudo apt install geographiclib-tools

# Add EGM2008 geoid grid to geographiclib
sudo geographiclib-get-geoids egm2008-1
2.6 安装 pacmod
#对于 Universe, rosdistro 变量还可以在该位置找到:../../playbooks/universe.yaml

wget -O /tmp/amd64.env https://raw.githubusercontent.com/autowarefoundation/autoware/main/amd64.env && source /tmp/amd64.env
# Taken from https://github.com/astuff/pacmod3#installation
sudo apt install apt-transport-https
sudo sh -c 'echo "deb [trusted=yes] https://s3.amazonaws.com/autonomoustuff-repo/ $(lsb_release -sc) main" > /etc/apt/sources.list.d/autonomoustuff-public.list'
sudo apt update
sudo apt install ros-${rosdistro}-pacmod32.7 安装 RMW 实现
对于 Universe, rosdistro 和 rmw_implementation 变量也可以在该位置找到:../../playbooks/universe.yaml
wget -O /tmp/amd64.env https://raw.githubusercontent.com/autowarefoundation/autoware/main/amd64.env && source /tmp/amd64.env
# For details: https://docs.ros.org/en/humble/How-To-Guides/Working-with-multiple-RMW-implementations.html
sudo apt update
rmw_implementation_dashed=$(eval sed -e "s/_/-/g" <<< "${rmw_implementation}")
sudo apt install ros-${rosdistro}-${rmw_implementation_dashed}
# (Optional) You set the default RMW implementation in the ~/.bashrc file.
echo '' >> ~/.bashrc && echo "export RMW_IMPLEMENTATION=${rmw_implementation}" >> ~/.bashrc2.8 安装 ROS 2
小鱼一键安装wget http://fishros.com/install -O fishros && bash fishros
2.9安装 ROS 2 开发工具
sudo apt update && sudo apt install -y \
  python3-colcon-mixin \
  python3-flake8-docstrings \
  python3-pip \
  python3-pytest-cov \
  ros-dev-tools \
  python3-flake8-blind-except \
  python3-flake8-builtins \
  python3-flake8-class-newline \
  python3-flake8-comprehensions \
  python3-flake8-deprecated \
  python3-flake8-import-order \
  python3-flake8-quotes \
  python3-pytest-repeat \
  python3-pytest-rerunfailures

# Initialize rosdep 或者使用小鱼的rosdepc
sudo rosdep init
rosdep update
2.10安装 Nvidia CUDA
使用nvidia SDK Manager安装,参考https://cennum.top/index.php/2025/09/12/%e4%bd%bf%e7%94%a8sdk-manager%e7%bb%99jetson-orin-nano-%e7%83%a7%e5%bd%95%e7%b3%bb%e7%bb%9f%e4%b8%8e%e7%8e%af%e5%a2%83/
2.11安装 Nvidia cuDNN 和 TensorRT
使用nvidia SDK Manager安装,参考https://cennum.top/index.php/2025/09/12/%e4%bd%bf%e7%94%a8sdk-manager%e7%bb%99jetson-orin-nano-%e7%83%a7%e5%bd%95%e7%b3%bb%e7%bb%9f%e4%b8%8e%e7%8e%af%e5%a2%83/
2.12安装 AutowareRViz 主题(仅影响 Autoware RViz)
#在更新主题时必须运行这两个命令。
cd ~/autoware # The root directory of the cloned repository
ansible-galaxy collection install -f -r "ansible-galaxy-requirements.yaml"
ansible-playbook autoware.dev_env.install_rviz_theme --ask-become-pass
#如何在 RViz2 中使用自定义主题参考https://github.com/autowarefoundation/autoware/tree/main/ansible/roles/qt5ct_setup#readme
#注意:找不到命令请重新开终端或者source
2.13下载工件(用于感知推理)
cd ~/autoware # The root directory of the cloned repository
ansible-galaxy collection install -f -r "ansible-galaxy-requirements.yaml"
#如果自动安装失败,手动安装见
2.14 安装spconv + cumm
参考https://github.com/autowarefoundation/autoware/tree/main/ansible/roles/spconv
#直接使用脚本安装即可
export CUMM_VERSION=0.5.3
export SPCONV_VERSION=2.3.8
ansible-playbook autoware.dev_env.install_spconv.yaml -e cumm_version=${CUMM_VERSION} -e spconv_version=${SPCONV_VERSION} --ask-become-pass
3.展开源码
vcs import src < autoware.repos
时间会比较长
4.使用rosdep安装ros依赖
rosdep update
rosdep install -y --from-paths src --ignore-src --rosdistro $ROS_DISTRO

sudo apt install -y \
ros-humble-diagnostic-updater \
ros-humble-geographic-msgs \
ros-humble-pcl-ros \
ros-humble-lanelet2-core \
ros-humble-lanelet2-io \
ros-humble-lanelet2-validation \
ros-humble-grid-map-core \
ros-humble-grid-map-ros \
ros-humble-grid-map-rviz-plugin \
ros-humble-xacro \
ros-humble-topic-tools \
ros-humble-velodyne-msgs \
ros-humble-radar-msgs \
ros-humble-usb-cam \
ros-humble-aruco \
ros-humble-ublox-msgs
5.源码编译安装opencv最新版
使用jetpack自带的opencv会编译失败
重新源码安装最新版本的opencv以及opencv_contrib模块
#安装 freetype 的开发依赖库
sudo apt update
sudo apt install libfreetype-dev libharfbuzz-dev

# 假设最新稳定版是 4.12.0
export OPENCV_VERSION="4.12.0"

# 创建新目录
mkdir opencv_build && cd opencv_build

# 下载主库和扩展模块的源码
wget -O opencv.zip https://github.com/opencv/opencv/archive/${OPENCV_VERSION}.zip
wget -O opencv_contrib.zip https://github.com/opencv/opencv_contrib/archive/${OPENCV_VERSION}.zip

# 解压
unzip opencv.zip
unzip opencv_contrib.zip
注意:在开始编译opencv之前,先安装quirc(contrib的必要依赖)
#拉取quirc源码
git clone https://github.com/dlbeer/quirc.git
cd quirc
#make
#sudo make install
#请注意quirc存在bug,需要修改makefile,实现只编译核心库
#安装也要手动安装
手动安装quirc方法
#安装库文件
sudo cp libquirc.a libquirc.so* /usr/local/lib/
#安装头文件
sudo cp lib/quirc.h /usr/local/include/
#更新动态缓存
sudo ldconfig
因为我们是手动安装,需要为 quirc 创建 pkg-config 文件,pkg-config 才能找到它
#创建 pkg-config 目录
sudo mkdir -p /usr/local/lib/pkgconfig
#创建并编辑 quirc.pc 文件
sudo nano /usr/local/lib/pkgconfig/quirc.pc

#将下内容复制进quirc.pc并保存
prefix=/usr/local
exec_prefix=${prefix}
libdir=${exec_prefix}/lib
includedir=${prefix}/include

Name: quirc
Description: A QR code recognition library
Version: 1.2
Libs: -L${libdir} -lquirc
Cflags: -I${includedir}
#验证 pkg-config是否安装成功
pkg-config --modversion quirc   #应输出1.2(版本号)
pkg-config --libs quirc         #输出-L/usr/local/lib -lquirc
使用最新的源码进行配置。务必将下面命令路径中的版本号 4.12.0 与您实际下载的版本保持一致。
# 进入新的源码目录并创建 build 文件夹
cd opencv_build
mkdir build
cd build
# 运行 cmake 命令(请注意修改你的OPENCV_EXTRA_MODULES_PATH为你的opencv_contrib-4.12.0/modules的路径)
cmake -D CMAKE_BUILD_TYPE=RELEASE \
-D CMAKE_INSTALL_PREFIX=/usr/local \
-D CMAKE_PREFIX_PATH=/usr/local \
-D OPENCV_EXTRA_MODULES_PATH=../opencv_contrib-4.12.0/modules \
-D WITH_CUDA=ON \
-D CUDA_ARCH_BIN=8.7 \
-D WITH_CUDNN=ON \
-D OPENCV_DNN_CUDA=ON \
-D ENABLE_FAST_MATH=1 \
-D CUDA_FAST_MATH=1 \
-D WITH_CUBLAS=1 \
-D WITH_V4L=ON \
-D WITH_GSTREAMER=ON \
-D WITH_OPENGL=OFF \
-D OPENCV_GENERATE_PKGCONFIG=ON \
-D BUILD_EXAMPLES=OFF \
-D BUILD_TESTS=OFF \
-D BUILD_PERF_TESTS=OFF \
-D BUILD_DOCS=OFF \
-D BUILD_opencv_python3=OFF \
-D BUILD_opencv_apps=OFF \
../opencv-4.12.0
make -j$(nproc)
sudo make install
#检查是否输出
find /usr/local/ -name "libopencv_barcode.so*"6.编译autoware源码
这里会可能遇到很多问题,请按照以下排除
- 在autoware_ws工作空间下成功执行rosdep_
rosdep update
rosdep install -y –from-paths src –ignore-src –rosdistro $ROS_DISTRO - 更新opencv到最新版本,并且编译安装好opencv_contrib模块_
按照 5.源码编译安装opencv最新版 执行成功 - autoware_elevation_map_loader这个包编译时会找不到opencv_contrib模块,使用符号连接新安装的opencv_contrib来解决
#创建符号链接,解决autoware_elevation_map_loader编译问题
sudo ln -s /usr/local/lib/libopencv_objdetect.so /usr/local/lib/libopencv_barcode.so
#更新动态连接
sudo ldconfig
colcon build --symlink-install --cmake-args -DCMAKE_BUILD_TYPE=Release
7.下载地图和其他资源
下载并解压示例地图(用于rosbag仿真demo)
gdown -O ~/autoware_map/ 'https://docs.google.com/uc?export=download&id=1A-8BvYRX3DhSzkAnOcGWFw5T30xTlwZI'
unzip -d ~/autoware_map/ ~/autoware_map/sample-map-rosbag.zip
下载示例 rosbag 文件(用于rosbag仿真demo)
gdown -O ~/autoware_map/ 'https://docs.google.com/uc?export=download&id=1sU5wbxlXAfHIksuHjP3PyI2UVED8lZkP'
unzip -d ~/autoware_map/ ~/autoware_map/sample-rosbag.zip
下载的地图文件和rosbag会放到$HOME/autoware_map目录下_
下载工件(启动参数文件)
cd ~/autoware # The root directory of the cloned repository
ansible-galaxy collection install -f -r "ansible-galaxy-requirements.yaml"
ansible-playbook autoware.dev_env.download_artifacts -e "data_dir=$HOME/autoware_data" --ask-become-pass
下载的工件会放到$HOME/autoware_data目录下,这个是启动antowate的参数文件
使用ansible-playbook脚本遇到网络问题的解决方法
Download tensorrt_bevdet 任务下载超时问题:会像下面这样报错
TASK [autoware.dev_env.artifacts : Download tensorrt_bevdet/tensorrt_bevdet.tar.gz] *
An exception occurred during task execution. To see the full traceback, use -vvv. The error was: TimeoutError: The read operation timed out
fatal: [localhost]: FAILED! => {"changed": false, "elapsed": 1, "msg": "failed to create temporary content file: The read operation timed out"}
找到home目录下autoware_data/tensorrt_bevdet文件夹执行以下命令手动下载
wget -c "https://autoware-files.s3.us-west-2.amazonaws.com/models/tensorrt_bevdet.tar.gz"Download lidar_transfusion/transfusion.onnx任务下载超时问题
#进入该目录手动下载
cd ~/autoware_data/lidar_transfusion
wget -c "https://awf.ml.dev.web.auto/perception/models/transfusion/t4xx1_90m/v2.1/transfusion.onnx"
Download tensorrt_rtmdet_onnx_models.tar.gz下载超时问题_
cd ~/autoware_data/tensorrt_rtmdet
wget -c "https://autoware-files.s3.us-west-2.amazonaws.com/models/tensorrt_rtmdet_onnx_models.tar.gz"
再遇到下载问题
- 在ansible-playbook脚本中找到错误的任务名,比如Download tensorrt_rtmdet_onnx_models.tar.gz,就是下载 tensorrt_rtmdet_onnx_models.tar.gz文件失败
- 在autoware源码中搜索该文件名
grep -r “tensorrt_rtmdet_onn” /autoware - 找到/autowaredata/文件夹下与该名称类似的名字,或者去问ai应该放哪
#使用wget命令下载
wget -c “下载地址”
再次执行ansible-playbook自动配置脚本,手动下载的会被识别到而跳过
ansible-playbook autoware.dev_env.download_artifacts -e "data_dir=$HOME/autoware_data" --ask-become-pass运行 rosbag 回放模拟
source ~/autoware/install/setup.bash
ros2 launch autoware_launch logging_simulator.launch.xml map_path:=$HOME/autoware_map/sample-map-rosbag vehicle_model:=sample_vehicle sensor_model:=sample_sensor_kit
#注意,您不能在这里使用 ~ 代替 $HOME 。
在播放 rosbag 之前,您可能在终端遇到错误和警告信息。这是正常行为。一旦 rosbag 播放并正确初始化,这些信息应该会停止。
播放示例 rosbag 文件
source ~/autoware/install/setup.bash
ros2 bag play ~/autoware_map/sample-rosbag/ -r 0.2 -s sqlite3
由于 rosbag 中的时间戳与当前系统时间戳存在差异,Autoware 可能会在终端生成警告消息,提醒这种不匹配。这是正常行为。
要聚焦于 ego 车辆,请在 RViz 视图面板中将 Target Frame 从 viewer 更改为 base_link 。_
要将视图切换到 Third Person Follower 等,请更改 RViz 视图面板中的 Type 。