本文章演示从源码编译rtabmap,并且配合intel realsense t265与d435进行地图构建
示例环境:ubuntu22.04 amd64 ROS2 humble
1.安装RTABMAP
尽管在ubuntu上你可以直接使用apt命令(以下命令)来直接安装安装 RTAB-Map ROS 2 包
sudo apt install ros-humble-rtabmap-ros
#rviz插件(可选)
sudo apt install ros-humble-rtabmap-rviz
sudo apt install ros-humble-rtabmap-rviz
但是不排除你有特殊情况,需要使用源码安装来获得RTABMAP的全部功能
1.1 进入你的工作空间
cd ~/ros2_ws/src/1.2. 克隆rtabmap和rtabmap_ros源码 (Humble对应的分支)
git clone https://github.com/introlab/rtabmap.git -b master
git clone https://github.com/introlab/rtabmap_ros.git -b humble-devel
1.3. 回到工作空间根目录并安装依赖,这一步可能会提示很多缺失的包,根据提示用sudo apt install …来安装(应该会有几个依赖使用rosdep install也不能发现……)
cd ~/ros2_ws
rosdep install -i --from-path src --rosdistro humble -y
1.4. 编译工作空间 。在编译前,最好先加载一下环境
source install/setup.bash
colcon build --symlink-install --cmake-args "-DCMAKE_BUILD_TYPE=Release"
这是最耗时的一步,耐心等待,我使用树莓派4b(4g)编译要十几个小时都不成功,最大的问题是爆内存
如果你编译也出现 c++: fatal error: Killed signal terminated program cc1plus 报错,那就是你的电脑的物理内存(RAM)和交换空间(Swap)全部耗尽了,你的程序被Linux内核的 OOM Killer (Out-Of-Memory Killer) 强制终止了。
两个解决方法:
- Increase swap space 缺点:增加swap会加快你内存卡寿命损耗,还会使你的系统变卡
- 限制编译时使用的cpu数量 缺点:会使编译变得特别慢
使用apt安装还是源码编译安装成功后,可以进入下一步
2.启动摄像头的ros2节点
rtab需要你输入摄像头(rgb或者rgbd)以及里程计(odom)数据,所以你需要先有一个节点来发布这些
以t265和d435为例,安装realsense SDK 2.51.1 和realsense ROS 4.51.1版本 (最后一个支持t265的版本,都需要源码编译安装)
按照~/ros2_ws/src/realsense-ros/realsense2_camera/launch/rs_multi_camera_launch.py来写一个launch同时启动两个摄像头
这里直接给出
import os
from launch import LaunchDescription
from launch.actions import IncludeLaunchDescription
from launch.launch_description_sources import PythonLaunchDescriptionSource
from launch_ros.actions import Node
from ament_index_python.packages import get_package_share_directory

def generate_launch_description():

    realsense_ros_dir = get_package_share_directory('realsense2_camera')

    sensors_launch = IncludeLaunchDescription(
        PythonLaunchDescriptionSource(
            os.path.join(realsense_ros_dir, 'launch', 'rs_multi_camera_launch.py')
        ),
        launch_arguments={
            # --- D435/D400 series camera ---
            'camera_name1': 'D400',
            'serial_no1': '_146322077649',     # ❗ 必须是您D435的序列号
            'depth_module.profile1': '640,480,15',
            'rgb_camera.profile1': '640,480,15',
            'enable_depth1': 'true',
            'align_depth.enable1': 'true',
            'pointcloud.enable1': 'true',

            # --- T265 camera ---
            'camera_name2': 'T265',
            'serial_no2': '_230322111176',     # ❗ 必须是您T265的序列号
            'enable_pose2': 'true',
            'enable_fisheye12': 'false',
            'enable_fisheye22': 'false',
            'publish_odom_tf2': 'true',
            'topic_odom_in2': 'odom',
            'pose_frame_id2': 'T265_pose_frame',
        }.items()
    )


    return LaunchDescription([
        sensors_launch,
    ])
这里启动了d435和t265,看到以下话题就说明摄像头启动成功了
cennum@cennum-ubuntu:~/fly_ws$ ros2 topic list
/D400/aligned_depth_to_color/camera_info
/D400/aligned_depth_to_color/image_raw
/D400/aligned_depth_to_color/image_raw/compressed
/D400/aligned_depth_to_color/image_raw/compressedDepth
/D400/aligned_depth_to_color/image_raw/theora
/D400/color/camera_info
/D400/color/image_raw
/D400/color/image_raw/compressed
/D400/color/image_raw/compressedDepth
/D400/color/image_raw/theora
/D400/color/metadata
/D400/depth/camera_info
/D400/depth/color/points
/D400/depth/image_rect_raw
/D400/depth/image_rect_raw/compressed
/D400/depth/image_rect_raw/compressedDepth
/D400/depth/image_rect_raw/theora
/D400/depth/metadata
/D400/extrinsics/depth_to_color
/D400/extrinsics/depth_to_depth
/D400/imu
/T265/imu
/T265/pose/metadata
/T265/pose/sample
/parameter_events
/rosout
/tf
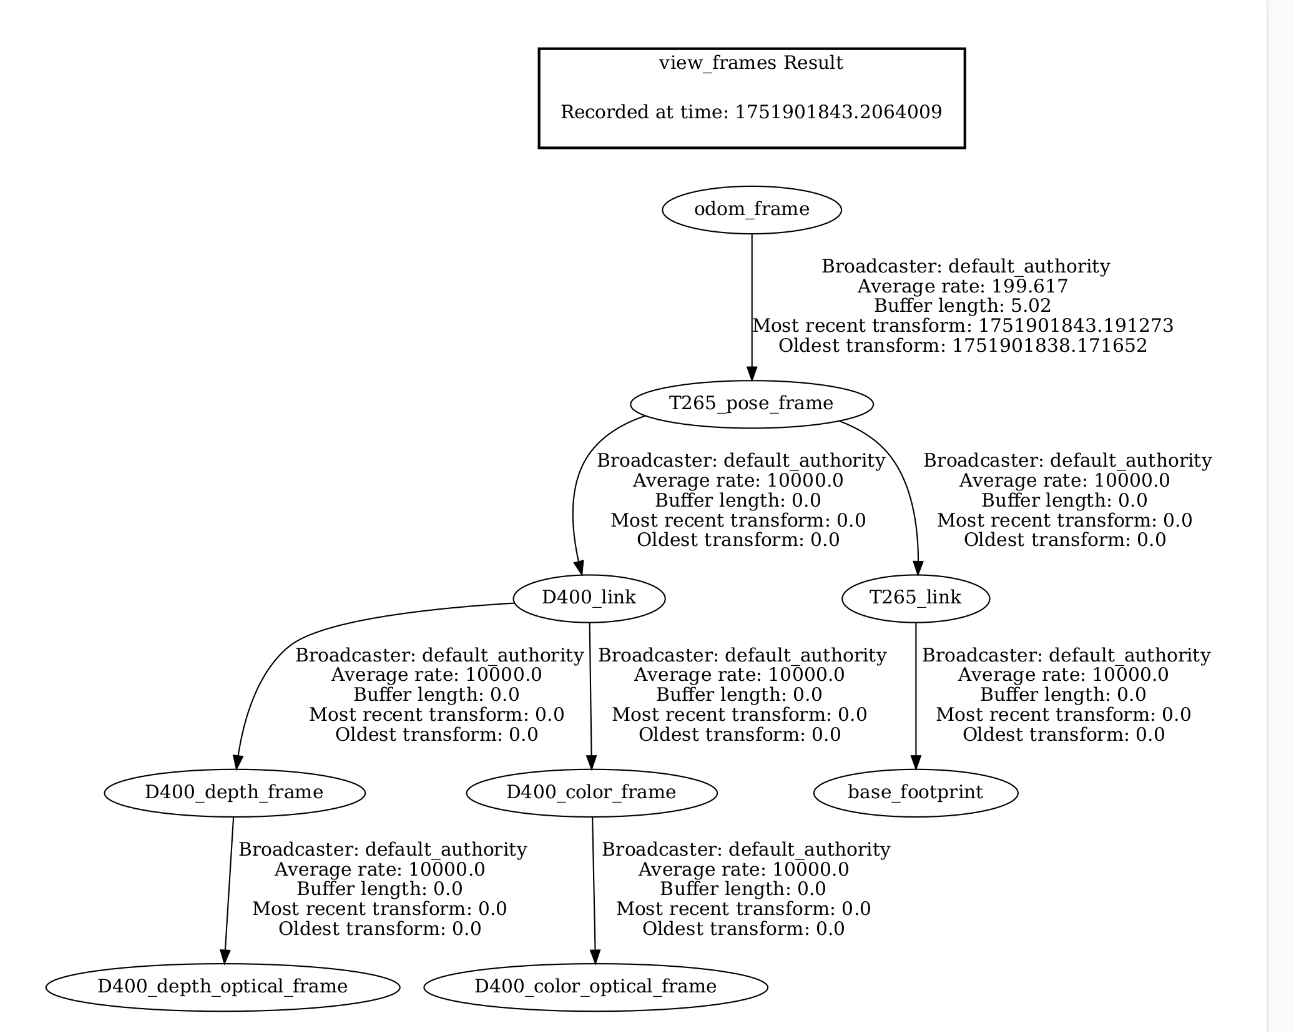
/tf_static此时的tf树(请忽略base_footprint,这个是我机器人上面的)
t265启动后会发布odom_frame–>T265_pose_frame–>T265_link(D400_link),这是主线
odom_frame为odom里程计,T265_pose_frame为t265的姿态

现在可以进入下一步
3.启动rtabmap并开始建图
还是使用launch来启动rtabmap,直接上代码
from launch import LaunchDescription
from launch.actions import DeclareLaunchArgument
from launch.substitutions import LaunchConfiguration
from launch_ros.actions import Node

def generate_launch_description():

    use_sim_time = LaunchConfiguration('use_sim_time')

    rtabmap_common_params = {
        'frame_id': 'D400_link',   #这里是对应d435相机
        'odom_frame_id': 'odom_frame', #这里是odom,与上面代码中相机发布的odom要一致
        'subscribe_depth': True,
        'subscribe_rgb': True,
        'subscribe_odom_info': False,
        'approx_sync': True,
        'approx_sync_max_interval': 0.1,
        'wait_for_transform': 0.2,
        'use_sim_time': use_sim_time,
        'Rtabmap/DetectionRate': '2',
        'Vis/MinInliers': '10',
        'Grid/CellSize': '0.05',
    }

    # 要与上面相机发布的话题对应
    rtabmap_remaps = [
        ('rgb/image', '/D400/color/image_raw'),
        ('rgb/camera_info', '/D400/color/camera_info'),
        ('depth/image', '/D400/aligned_depth_to_color/image_raw'),
        ('odom', '/T265/pose/sample'),
    ]

    return LaunchDescription([
        DeclareLaunchArgument(
            'use_sim_time',
            default_value='False',
            description='Use simulation (Gazebo) clock if true'),

        Node(
            package='rtabmap_slam',
            executable='rtabmap',
            name='rtabmap',
            parameters=[rtabmap_common_params],
            remappings=rtabmap_remaps,
            output='screen',
        ),

        Node(
            package='rtabmap_viz',
            executable='rtabmap_viz',
            name='rtabmap_viz',
            parameters=[rtabmap_common_params],
            remappings=rtabmap_remaps,
            output='screen',
        )
    ])
4.编译工作空间,运行launch
回到工作空间跟目录编译
colcon build --symlink-install依次启动上面的俩个launch文件
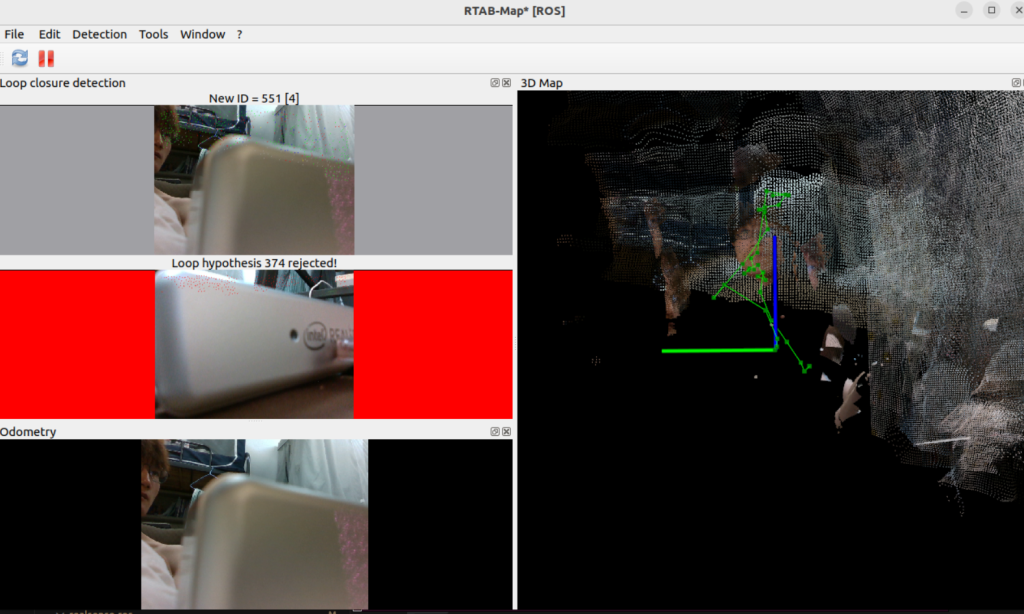
几个画面都显示就是成功了,不想拿起来就不演示了
5.建图完成,保存并导出
5.1 保持为.db数据库文件
直接ctrl+c关闭,地图最默认保存在~/.ros/rtabmap.db
5.2 导出用于Nav2导航的2d柵格地图
使用ROS 2内置的 map_saver 工具,不要关闭正在运行的所有节点,打开新的终端,运行
ros2 run nav2_map_saver map_saver_cli -f ~/my_map这个命令会生成Nav2导航需要用到的.pgm和.yaml文件
-f ~/my_map:指定保存路径
5.3 导出3D点云地图
如果你想使用其他3D软件查看(如 CloudCompare、MeshLab)可以导出为点云格式(如 .pcd 或 .ply)
使用rtabmap提供的数据库查看工具,建图完成后关闭所有节点,地图会自动保存在~/.ros/rtabmap.db
在终端中打开rtabmap数据库查看器
rtabmap-databaseViewer ~/.ros/rtabmap.db在这个工具里面查看你的地图或者选择你要保存的格式
gejvpevxipxdtndjvfgpiihpftzxnv
Hai, saya ingin tahu harga Anda.
Apakah harga sesuatu?